4-Ingredient Healthy Spelt Crepes (Clean)

dsc_1168

dsc_1166

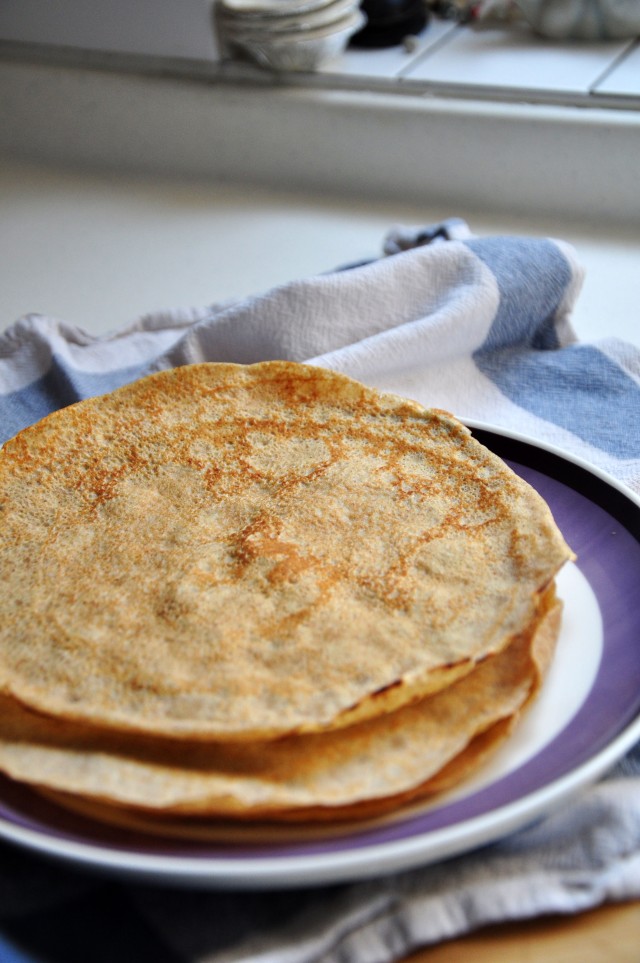
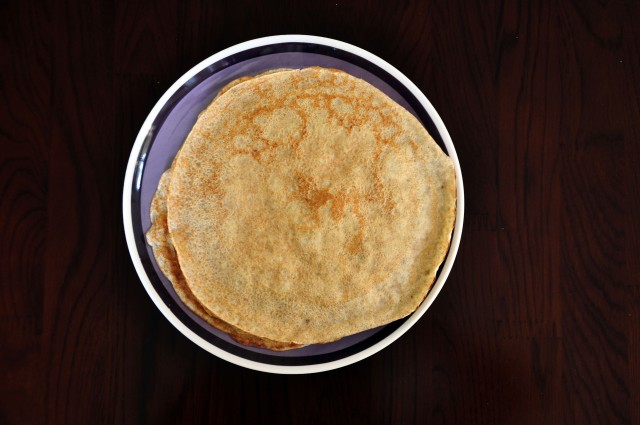
I love crepes. To be honest, I probably love making crepes as much as I enjoy eating them. They’re honestly one of my favorite things to make. Call me a loser, but it’s just so cool to see the silky batter cook to form lacy edges and these beautiful, golden brown designs.

dsc_1163

dsc_1119

You’ll almost always find crepes in my fridge, just because I can’t eat them as fast as I make them! I’ll usually make a large batch on Sunday and eat them for breakfast or (my current favorite snack) make banana sushi! It’s basically where you spread a generous layer of peanut butter over a crepe, add a banana, roll it up, and then cut it like you would cut sushi. I’m not sure why, but I’ve been really obsessed with that lately.

dsc_1165

Anyways, I tried to make these crepes a little healthier. I used to make healthy buckwheat crepes, and those are amaazing! If you’re looking for a gluten-free crepe recipe, then definitely go for that one. Anyways, these spelt crepes give you a thinner, more flavorful crepe. The ingredients for both crepes are essentially the same, but with one addition to the spelt crepes – applesauce! Yes, you heard that right. Crepes are generally made with butter. In my buckwheat crepe recipe, I chose to omit it entirely, but here, I’ve added a little applesauce, which gives the crepes a lighter consistency, but keeping them just as healthy!

dsc_1159

dsc_1172

4-Ingredient Healthy Spelt Crepes

Makes approx. 10 crepes

Ingredients

  • 2 eggs
  • 1 cup almond milk
  • 1/2 cup water
  • 1 cup spelt flour
  • 3 tablespoons applesauce

Method

  1. Whisk all the ingredients together until smooth
  2. Place the batter in the fridge and allow it to rest for 1 hour, or up to 48 hours
  3. Heat a non-stick pan over medium-high heat and spray the pan with cooking oil or brush on a little coconut oil
  4. Turn the heat down to medium-low and pour 1/3 cup of the batter into the pan. Swirl the batter around so that it spread into an even, thin layer
  5. Cook until the crepe is dry before flipping it over and cooking briefly on the other side
  6. Repeat with the rest of the batter

Fruity Rainbow Fro-Yo Popsicles (Clean)

Expect lots of ice cream recipes these days, ’cause my freezer it literally full of it right now.

DSC_0962.

DSC_0931.

Also – I figured out a problem to that Photoshop problem. I had a bunch of recipes with unedited photos, but my laptop died and my brother’s laptop doesn’t have Photoshop. My solution – using a 7-day trial. Hell yes.

So instead of working on my college apps and my math IA, I’ll gladly spend these next 6 days editing all the photos I had procrastinated.

DSC_0969..

DSC_0985.

These fruity popsicles are perfect for the killer heat this summer. I haven’t left my house for the past week until today, when I took my dog for a walk. I had only been outside for about 5 minutes before I started sweating and my dog was panting like crazy. Needless to say, it was a short walk. When I got home, the first thing I went to grab was one of these popsicles. I gave my dog her water, which she lapped up, but then she just stared at me longingly as I enjoyed my cold popsicle. Poor puppy.

DSC_0972.

DSC_0974.

Feel free to sub in whatever fruit you want, depending on what you have on hand. Oh, and no – blueberries do not make a blue layer, but you could experiment around with spirulina powder to get a turqoise-colored layer.

DSC_0968.

DSC_0982.

Fruity Rainbow Fro-Yo Popsicles

Ingredients

  • 3 cups greek yogurt
  • 1/2 cup cherries or raspberries
  • 1/2 cup pineapple chunks
  • 1/2 cup chopped kiwi
  • 1/2 cup blueberries
  • 1 tablespoon açai powder
  • Honey, to taste

Method

  1. Distribute the yogurt evenly among 5 bowls
  2. In a food processor, blend each fruit separately and set aside. Start off with the lightest colors and gradually use darker ones to avoid washing your food processor/blender every time (pineapple -> kiwi -> cherries/raspberries -> blueberries
  3. Stir the pineapple, kiwi, and cherry/raspberry fruit purees into the bowls of yogurt. For the two distinct layers of purple, stir about a tablespoon of blueberry puree in one, and the rest into the other. Add the açai powder to the yogurt with more blueberry.
  4. Stir in half a teaspoon or so of honey into each bowl, if desired.
  5. Layer the yogurt into popsicle moulds. If your yogurt is runny, it may be easier to freeze the yogurt in between layers
  6. Freeze for 4-6 hours

Vegan Chocolate Truffles (Clean)

Last week, I posted a recipe here for these amazing silky chocolate truffles. God, that’s got to be one of my absolute favorite recipes. It’s not very healthy, but treating yourself to a little delicious melt-in-your-mouth chocolate truffle every now and then doesn’t hurt.

DSC_0721.

DSC_0724.

Nevertheless, it’s definitely not vegan, and wouldn’t it be great if there was a healthy version of those truffles…chocolate truffles so healthy that you could eat multiple at a time and not feel bad about yourself? Not that I ever feel guilty about overeating chocolate truffles, but y’know, for the people who do.

DSC_0722.

DSC_0725.

So now, I present to you…healthy, vegan, and naturally sweetened chocolate truffles!!! Ooh – and they come together using just 5 main ingredients.

DSC_0731.

DSC_0727.

These are actually very similar to the other chocolate truffle recipe. They melt in your mouth as long as you keep them at room temperature (they weren’t at room temperature when I took these photos, so if they don’t look super duper smooth and velvety in the photos – that’s why. Trust me, they were silky AF later on!)

DSC_0732.

DSC_0730.

Oh, and there’s a bonus element to this recipe. Thanks to the dates, you get this touch of caramel flavor next to the chocolate. Win!

DSC_0734.

DSC_0737.

Vegan Chocolate Truffles

Adapted from Harriet Emily

Makes 24 little truffles

Ingredients

  • 3/4 cup (165g) medjool dates (about 16 dates), pitted and roughly chopped
  • 3/4 cup (185ml) boiled water
  • 1/2 cup (90g) extra virgin coconut oil
  • 3/4 cup + 1 tablespoon (90g) raw cacao powder
  • 1 teaspoon powdered stevia (or 1/2 teaspoon liquid)
  • 1/2 teaspoon pure vanilla extract
  • Pinch of salt
  • Toppings of choice (e.g. cacao nibs, shredded coconut…) (optional)

Method

  1. Soak the pitted and chopped dates in the boiling water for 5-10 minutes to soften them
  2. Add both the dates and the water into your food processor, along with the coconut oil, and blend until smooth
  3. Add in the cacao powder, stevia, vanilla, and salt. Blend until smooth
  4. Transfer mixture into a container with a removable base, or a container lined with parchment paper/plastic wrap, smoothing it out
  5. Chill in fridge for at least 4 hours
  6. Remove from container, slice into squares, and serve. They taste best when served at room temperature

Sugar-Free One-Bowl Apple Oatmeal Muffins (Clean)

Apple_Oatmeal_Muffins-2

DSC_0034-1

I’ve posted muffin recipes before, but all of the classics – blueberry oatmeal muffins, double chocolate muffins, chocolate chip…but never apple oatmeal. In fact, I barely even have any apple recipes around here. I think it’s start I adding to that collection.

Apple_Oatmeal_Muffins-1

DSC_0041-3

I always seem to have too many apples in my fridge. My brother loves apples. He’d literally eat an apple every day, so we’d be perfectly fine buying a bag of apples every time we went grocery shopping (which, with me in the house, happened pretty often). Now, he’s off at college, and we seem to always have apples in the fridge. My mom tries to get me into the same healthy apple-a-day routine as my brother, but to be honest, I’m not a huge fan of apples.

Not to say that I dislike apples, but like, in terms of texture and flavor, I’m kinda meh about them. What I do love, though, is incorporating them in baked goods. Remember that apple pie I made ages ago? Yeah, that was a damn good pie and one of my favorites.

Point is, to me, apples are okay on their own, but they get so much better when combined into baked goods and paired with some good old-fashioned spices.

Apple_Oatmeal_Muffins-3

I love this recipe because it’s so easy, and if you’re like me (with a fridge full of apples 24/7), you can whip these up pretty much anytime you want. The whole recipe comes together in one bowl, and only takes 5 minutes or so.

Not to mention, they’re so good for you! They’re naturally sweetened with applesauce and stevia, with only 2.9 grams of sugar per serving! That’s practically nothing. FYI – a 46g Kit Kat bar has 22g of sugar.

DSC_0040-2

Apple_Oatmeal_Muffins-5

Sugar-Free Apple Oatmeal Muffins

Makes 12 muffins

Ingredients

  • 1 cup old fashioned oats
  • 1 cup white whole wheat flour
  • 1 teaspoon baking powder
  • 1/2 teaspoon baking soda
  • 1 teaspoon ground cinnamon
  • 1/2-1 tablespoon powdered stevia (adjust to taste)
  • 1/2 teaspoon salt
  • 1 cup unsweetened applesauce
  • 2 eggs
  • 1/4 cup coconut oil, melted and cooled
  • 3/4 cup almond or soy milk
  • 1 teaspoon vanilla extract
  • 1 medium or large apple, peeled, cored, and chopped
  • 1/4 cup chopped nuts (optional)

Method

  1. Preheat oven to 205 degrees Celsius or 400 degrees Fahrenheit
  2. In a bowl, stir together oats, flour, cinnamon, baking soda, baking powder, stevia, and salt
  3. Mix in the applesauce, eggs, coconut oil, milk of choice, and vanilla extract
  4. Stir in the chopped apple and chopped nuts, if using
  5. Transfer batter into a greased or lined muffin tin and bake for 20 minutes

Salted Chocolate-Covered Caramels (Clean)

DSC_0012.

Has anyone noticed that it’s been way too long since I last posted a recipe involving chocolate? Seriously – the last chocolate-focused recipe I’ve posted is the unbelievably healthy beetroot chocolate microwave cake over a month ago (gasp)! That was a damn good recipe, but then again, that’s no excuse for the lack of chocolate on this blog these days.

DSC_0004.

DSC_0018.

So – although not completely chocolate-focused (ok I’ll try to make my next post ridiculously chocolate-y), these are salted chocolate-covered caramel bites, and they are so goodNot to mention refined sugar-free, oil-free, gluten-free, and vegan! Not to mention that you only need 6 main ingredients; 4 if you’re not making chocolate coating from scratch!

DSC_0006.

Remember that 2-ingredient date caramel I made a while back? Yeah, this is pretty much a fancied-up version of that. I love the date caramel, but I gotta admit, this recipe kicks it’s ass.

DSC_0010.

You know what’s really good? Chocolate. You know what else is really good? Caramel. You know what’s really really good? Salted chocolate AND salted caramel! How could you not be excited about that?? And it’s pretty much naturally sweetened? And like pretty good for you? Are you feeling me here?

DSC_0013.

Don’t you even try to tell me that dates aren’t like caramel. Ok, if you just pop a date in your mouth, it doesn’t scream caramel, but when you blend it all up and it gets all sticky – trust me. You’ll be fooling everyone, including yourself.

DSC_0027.

Salted Chocolate-Covered Caramels

Ingredients

  • 15 medjool dates (approx. 130g without pits)
  • 1 1/2 cup boiling water
  • 1 tablespoon + 1/2 cup coconut oil, melted*
  • 1/4 cup raw cacao powder*
  • 2-3 tablespoons maple syrup (or sweetener of choice)*
  • Flaky sea salt

*You can also melt dark chocolate over a double boiler or melt it in the microwave at 15-second intervals

Method

  1. Soak the dates in the boiling water for 20-60 minutes until softened. Remove the dates from the water, but don’t dispose the water
  2. Pit the dates if they haven’t already be pitted, and place them in a food processor with 1/4 cup of water and 1 tbsp of coconut oil and combine until smooth. The mixture should be relatively sticky
  3. Roll the mixture into truffle-sized balls, about a heaped tablespoon at a time. Transfer the caramels onto a baking sheet lined with parchment paper and place in fridge for at least 30 minutes while preparing the chocolate coating
  4. Whisk together the 1/2 cup coconut oil, cacao powder, and maple syrup until well-combined
  5. Remove the caramels from the fridge, and use a fork to dip them individually into the chocolate coating mixture. Place them back onto the baking sheet lined with parchment paper for the chocolate coating to set. Before the chocolate coating sets completely, sprinkle a little bit of flaky sea salt over it. Repeat with the rest of the caramels
  6. Allow the chocolate coating to set. Store in fridge or freezer.

Red Velvet Beetroot Pancakes (Clean)

DSC_0130.

A few weeks ago in mid-January, I was scrolling through Foodgawker as I always do, and I noticed that people had already started posting Valentine’s Day recipes, and I was pretty confused – it wasn’t even February yet! Well, now that it’s actually February, here’s a “Valentine’s Day”-inspired recipe, because you can’t go wrong with pink food on Valentine’s! Not to mention – gluten-free, sugar-free, and oil-free pink!

DSC_0091.

Might I add that you don’t need to have a significant other or a Valentine to make these? Yeah, yeah, Valentine’s is usually about those you love romantically, but that doesn’t mean that love stops there. Make these to show your appreciation for your mother, your father, your brother, or even for yourself, because you should love yourself no matter what. There will always be times where you get down and feel like you aren’t worthy and capable of achieving the expectations that society throws at you, and your mind may automatically begin to close out all the things you love about yourself until you feel worthless. Times like that, take a break from the world and recall all the amazing things you’ve achieved in life and kind things you’ve done, no matter whether it was winning a race or taking the time to donate a little to a charity you support. All of those moments, added up, will be infinite. Thus, your love for yourself should be just that – infinite.

DSC_0140.

DSC_0157.

With all that deep life talk aside, let’s just appreciate these pancakes.

DSC_0129.

DSC_0143.

These pancakes are quite fluffy and the beetroot flavor isn’t evident at all (good for those who don’t like beetroot – if you do, I guess you could add in double the amount of beetroot and see how that goes…). If you have a heart-shaped cookie cutter or egg-shaper, that would just bring these to the next level and make them look so gorgeous. Plus, I wouldn’t omit the melted chocolate, because that just contributes so much to the appearance, flavor, and Valentine-feel. As for fruit, chocolate-dipped strawberries or raspberries would be beautiful as well if you’re short on cherries!

DSC_0164.

DSC_0161.

Oh, and may I also add that these photos were taken nearly a year ago? Obviously, my photography and editing have come a long way, but this recipe is too good not to share. Plus, I’m quite happy with this gif:

Red-Velvet-Beetroot-Pancakes DSC_0142.

Red Velvet Beetroot Pancakes

Adapted from Dessert With Benefits

Makes 6-10, depending on size

Ingredients

  • 1/3 cup coconut flour
  • 1 tablespoon raw cacao powder
  • 2 teaspoons powdered stevia
  • 1 teaspoon baking powder
  • Pinch of salt
  • 3/4 cup beetroot purée*
  • 2 large eggs
  • 3/4 cup milk of choice
  • 1 teaspoon pure vanilla extract
  • 1 teaspoon apple cider vinegar
  • Melted chocolate/fresh fruit, for serving (optional, but recommended)

*To make the beetroot purée, stick the beetroots (unpeeled) in a big pot of boiling water until they’re soft, peel them, and purée them in a food processor. Use leftovers for any of these recipes calling for beetroot purée.

Method

  1. In a small bowl, whisk together the coconut flour, cocoa powder, stevia, baking powder, and salt
  2. In a large mixing bowl, whisk together the beetroot purée and eggs, before whisking in the milk of choice, vanilla extract, and vinegar
  3. Heat a pancake pan or a relatively flat saucepan over medium heat. Spray with oil and spoon about 1/4-1/3 cup of mixture onto the pan, spreading them into circles. Cook until the edges are dry and the surface is slightly dry. The pancakes take longer to cook than regular pancakes, so about 3-5 minutes.
  4. Flip and cook for about a minute on the other side, before flipping out onto a plate. Continue to cook the batter until all of it is used up.
  5. Stack them up, top with melted chocolate and fresh fruit, and serve!


Sugar-Free Chocolate Chip Quinoa Muffins (Clean)

School is starting up again, and as always, I’ve got a batch of muffins in my fridge to allow for easy school-snacking. A muffin (or two) a day keeps the school stress away.

DSC_0375.

DSC_0361.

So – why are these chocolate chip quinoa muffins so perfect as on-the-go snacks? Let’s talk quinoa.

Quinoa (pronounced keen-WAH) is a seed, though it’s often used as a grain. It’s gluten-free, with a tiny amount of fat, but more importantly, it’s a complete protein, making it an ideal protein source for all the vegetarians and vegans out there. A cup of quinoa gives you 222 calories, along with 8.1g protein and 58% of your RDA for magnese. It’s fibrous with a low glycemic index, keeping you full for a longer period of time, which is why I am oh-so-grateful for having these with me during school and getting me through the classes leading up to lunch.

DSC_0395.

DSC_0391.

DSC_0399.

Sugar-Free Chocolate Chip Quinoa Muffins

Ingredients

  • 2 cups (240g) cooled, cooked quinoa
  • 1 cup (120g) white whole wheat flour
  • 1 cup (130g) light rye flour (Or more white whole wheat)
  • 2 tablespoons powdered stevia
  • 1 1/2 teaspoons baking powder
  • 1 teaspoon salt
  • ¼ cup coconut oil, melted and cooled
  • ½ cup buttermilk
  • 1 large egg
  • ¼ cup plain Greek yoghurt
  • 1 teaspoon vanilla extract
  • ½ cup mini chocolate chips

*If you want a sweeter muffin, feel free to add in a bit of honey/coconut sugar and adjust to taste

Method

  1. Preheat oven to 175 degrees Celsius or 350 degrees Fahrenheit
  2. In a medium mixing bowl, whisk together quinoa, flours, stevia, baking powder, and salt
  3. In a separate mixing bowl, whisk together coconut oil, buttermilk, egg, greek yoghurt, and vanilla extract until smooth
  4. Pour the wet mixture into the smooth mixture and stir until just combined, before folding in the chocolate chips. Do not over mix
  5. Transfer the mixture into a lined muffin/cupcake tin and bake for approximately 25 minutes, until a toothpick inserted into the middle of one comes out clean. Allow to cool and enjoy!

3-Ingredient Avocado Banana Chocolate Mousse (Clean)

Who says healthy chocolate mousse can’t be festive?

DSC_0024.

Alright, fine, “avocado banana chocolate mousse” doesn’t exactly scream Christmas, but hey, the red background is quite festive, no?

DSC_0021

Either way, this is a recipe that I make on almost a weekly basis. Granted, I don’t always make it look all pretty in a coffee cup, but still. It literally takes like 2 minutes to throw together (which is less time than the average smoothie because you don’t actually have to rinse anything…).

DSC_0018.

DSC_0025.

This is the perfect kind of breakfast you’d want to have in preparation for perhaps a huge-ass Christmas brunch or dinner or both. For one – it’s light and sweet without making you feel loaded and without giving you major energy crashes. Also – it’s vegan and sugar-free and raw and gluten-free and will fit pretty much every other dietary restriction you have.

DSC_0069.

The idea of eating blended avocado purée may seem horrifying to some, but I guarantee that you can’t taste it whatsoever. The flavor of chocolate and the light sweetness of the banana mask the taste of avocado, while still retaining its creaminess and superfood powers – win-win!

DSC_0037.

*You can get a 10% discount off of ALL products at Creative Nature Superfoods (no minimum!) with the discount code CHIAC10

Avocado Banana Chocolate Mousse

Makes 1 serving

Ingredients

  • 2 overripe bananas
  • 1/2 avocado
  • 3 tbsp Creative Nature Superfoods raw cacao powder*
  • Pinch of powdered stevia or maple syrup (to taste) (optional)
  • 1/2 tsp pure vanilla extract (optional)
  • Toppings (banana, raspberries, cacao nibs, shredded coconut etc.) (optional)

Method

  1. Throw everything in a blender and blend until smooth
  2. Serve with toppings of choice