Éclairs (Cheat)

Éclairs!

DSC_0146.

DSC_0071.

DSC_0116.

Éclairs are super fancy and although they’re not the “easiest” to make, they’re so worth it. To be honest, I found the process to be quite enjoyable. I love making choux pastry and pastry cream. Am I the only one? I mean, beating together a few ingredients and then watching the choux pastry cook into such a soft dough that doesn’t stick to the sides of your saucepan is almost magical. Then there’s whipping the heated cream mixture slowly into the egg yolk mixture to prevent the yolk from scrambling, before pouring the whole lot back into the saucepan and watching it thicken into a sweet, aromatic pastry cream. I sound insane. Okay, I’ll stop.

DSC_0108.

DSC_0115.

DSC_0122.

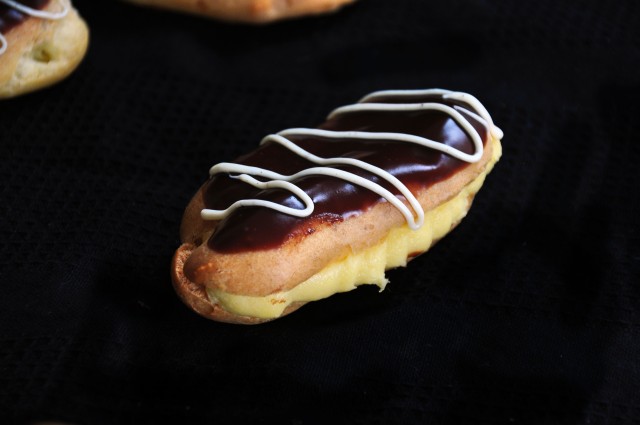
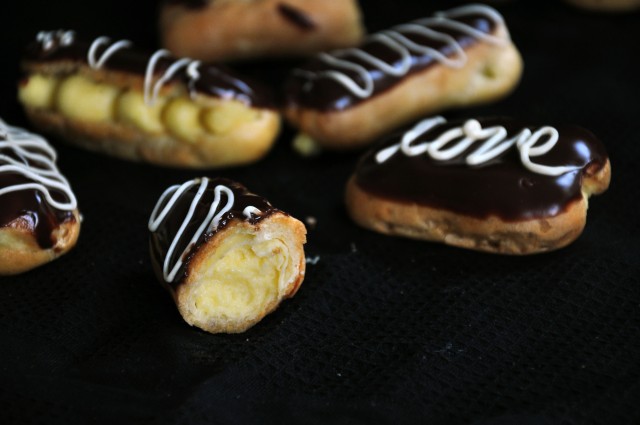
You can experiment with so many flavors when it comes to éclairs, but I decided to stick with a pretty classic pastry cream and finish it off with chocolate ganache and melted white chocolate.

…I know I said I’d stop, but don’t you love making ganache too? Letting the hot cream sit with the chocolate and letting heat energy go back and forth between the two and disrupting bonds as the chocolate melts and becomes one with the cream…ok ok, I’m done.

DSC_0136.

DSC_0139.

Well, what are you waiting for? Go make these delicious pastries for Mother’s Day!

DSC_0144.

DSC_0149.

DSC_0140.

Éclairs

Adapted from Will Cook For Smiles

Ingredients

For the pastry cream:

(This will need to be prepared a few hours ahead, or the day before you assemble the éclairs)

  • 4 large egg yolks
  • ½ cup sugar
  • Pinch of salt
  • 1 cup of whole milk
  • ⅓ cup flour
  • ⅔ cup of heavy whipping cream
  • 4 tablespoons cold unsalted butter
  • 1 vanilla bean

For the Choux pastry:

  • 1 cup of water
  • ½ cup unsalted butter
  • 1 Tbsp white granulated sugar
  • 1 tsp vanilla extract
  • 1 cup + 3 tablespoons all-purpose flour
  • 4 large eggs

For the ganache:

  • 110g good quality dark chocolate, chopped
  • ½ cup heavy whipping cream
Method
  1. For the pastry cream, in a medium mixing bowl, whisk together egg yolks, sugar, and salt until combined
  2. Whisk in the flour until smooth and set aside
  3. In a saucepan, gently heat the milk, heavy cream, and butter together. Cut the vanilla bean in half and scrape the seeds into the milk mixture and add in the empty vanilla bean as well
  4. Heat until simmering, and then remove the vanilla bean and slowly whisk the milk mixture into the egg mixture, making sure that the egg doesn’t scramble
  5. Pour all of the mixture back into the saucepan and heat while constantly stirring until thickened. This should take a few minutes
  6. Pour the cream into a bowl or onto a plate and allow to cool before covering it with plastic wrap (with the plastic touching the surface of the cream) and placing it in the fridge for at least 4 hours
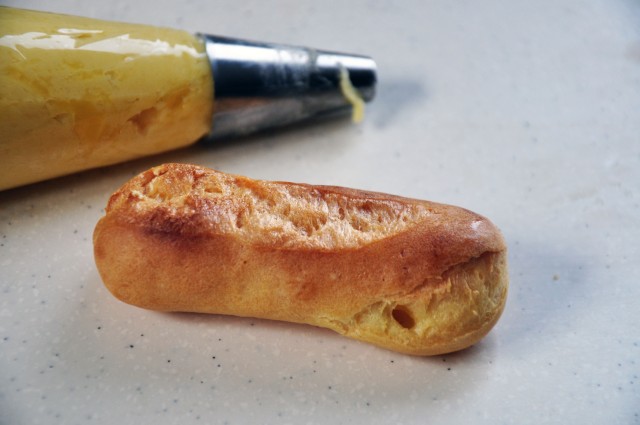
  7. For the Choux pastry, preheat oven to 200 degrees Celsius or 400 degrees Fahrenheit
  8.  In a saucepan, heat and mix the butter, sugar, vanilla extract, and water together until the mixture is lightly simmering
  9. Beat in the flour using a wooden spoon until combined and the mixture doesn’t stick to the sides of the saucepan
  10. Transfer the mixture into the bowl of a stand mixer, or using an electric mixer, and beat in the eggs one at a time, making sure that each egg is fully mixed before adding the next
  11. Transfer the batter into a piping bag and, on a large baking sheet lined with parchment paper, pipe thick lines of pastry about 4cm (1.5 inches) in width and 8cm (3 inches) in length. They should also be about 2cm (almost 1 inch) tall
  12. Bake for 25-28 minutes, until golden brown. Allow to cool before filling
  13. For the ganache, place the chopped chocolate into a small mixing bowl.
  14. In a small saucepan, bring heavy cream to simmer
  15. Pour the hot cream over the chopped chocolate and allow to sit for a few minutes before stirring together with a whisk until smooth
  16. To assemble the éclairs, fill a piping bag with the cold pastry cream. Gently insert the tip into the cooled pastry and squeeze cream into it. Alternatively, cut the pastries lengthwise and fill the insides
  17. Dip each filled pastry in the chocolate ganache and drizzle a bit of melted white chocolate over it, if desired. Keep refrigerated.

Silky Chocolate Truffles (Cheat)

You know those reallllyyy good Japanese chocolate truffles? I’ve figured out how to make them at home.

DSC_0085.

DSC_0084.

I still remember the batch of chocolate truffles that made me fall in love with chocolate truffles. To be honest, it was only a year or two ago, and I don’t mean Lindt chocolate truffles, I mean pure, silky, squares of chocolate that literally just melt in your mouth. My friend had just gotten back from Japan and he gave me a box of Royce Nama Chocolate.

My life changed.

The box of truffles was gone within a day.

DSC_0080.

Luckily for me, I always manage to get my hands on more Royce Nama Chocolate, but even then, the chocolates don’t last very long (I mean in terms of storage, although true, I do end up finishing them all in a very short period of time), so I needed to figure out a way to make them myself.

DSC_0073.

DSC_0089..

I used very few, simple ingredients for this. I didn’t want anything to overpower or affect the pure flavor of chocolate. Thus, the truffles are mostly made from high-quality chocolate, along with cream, butter, and a bit of liquid sweetener to give it that irresistible silky texture.

DSC_0097.

Not to mention, this recipe is super easy to make. It literally takes like 10 minutes to throw together, and you just wait a bit for it to set and voila – you have a perfect Mother’s Day gift. I’m being totally serious when I say that these taste way better than any store-brought version. Plus, it saves you the trouble of running around looking for gifts, and of course, homemade goods are always so much better gifts that store-brought ones.

DSC_0102.

Notes: The recipe can easily be doubled if you want a larger batch of chocolate truffles, which I recommend (because c’mon…12 truffles is not enough 😉 )

Silky Chocolate Truffles

Makes 12 truffles

Ingredients

  • 250g high quality dark chocolate, chopped
  • 200g heavy cream
  • 20g light corn syrup or honey
  • 60g unsalted butter, cubed
  • 50g cocoa powder, for dusting

Method

  1. Add the chopped chocolate into a food processor
  2. In a medium saucepan, whisk together the heavy cream and corn syrup/honey, and heat over medium heat
  3. When the heavy cream mixture is almost boiling, turn on the food processor to process the chocolate
  4. With the food processor on or off, add the heavy cream mixture to the chocolate and process until it just comes together
  5. Add in the butter and process to combine until no butter streaks remain
  6. Pour the mixture into a baking pan lined with parchment paper or plastic wrap and spread evenly
  7. Allow the mixture to cool for a few hours, until set, before placing it into the refrigerator for 20 minutes
  8. Remove the ganache from the baking pan and remove the parchment or plastic wrap. Cut into cubes and roll in cocoa powder
  9. Serve truffles at room temperature

Red Velvet Rose Cake with Cream Cheese Frosting (Cheat)

SCHOOL IS OVER. I’m aiming to make the most of this summer, as next year’s summer will be 80% devoted to studying :(. Anyways, the recipe I’m sharing today is one that I made approximately 8 months ago…

DSC_0802.

2014-11-26 10.47.55.

Yeah. I made it for my mom’s birthday, which is in November. Here I am, posting the recipe in June. You can probably tell that these photos were from a little while ago, considering the bad lighting and whatnot, but the cake tasted amazing and I didn’t know if I’d ever make the exact same cake again, so I figured that I may as well post this one.

IMG_9287.2014-11-29 08.39.48..

My mom absolutely adored this cake. It’s literally 100% perfectly suited to her taste, and the rest of my family’s taste for that matter. Why? Well…

2014-11-29 08.43.12.

We don’t like Chinese cakes. They’re really really fluffy, which is okay, I guess, but they don’t taste like anything. They’re just fluffy cakeness, and they’re filled with tons and tons of cream that, yet again, don’t really taste like anything. My grandparents got a cake once for one of their birthdays, and it ended up being like, 80% cream and 20% cake. Then the cakes are usually topped with more cream (but in different colors) and whatnot. Don’t get me wrong, I don’t hate Chinese bakery cakes ALL the time. I’d still eat them, but c’mon…

We don’t like American buttercream (well, I’m okay with it). They think that it’s way to sweet, and the cakes are usually quite high in sugar too. I looked at dozens of cream cheese frostings prior to this cake, and the cream cheese to sugar ratio varied drastically. Some frostings required 7 cups of powdered sugar, and some required 2, with the same amount of cream cheese! I went with one that’s less sweet, which doesn’t make you want to puke after 2 slices of cake, and lets the distinct flavor of the cream cheese remain. There’s 16oz of cream cheese to 2 cups of powdered sugar, which is a pretty decent ratio, in my opinion, with a little bit of butter. Feel free to add more sugar to taste.

IMG_9286..

IMG_9284.

If you’re wondering about piping the roses, it’s seriously so much easier than I thought. It took me about 5 minutes to pipe the roses. I’m not kidding. All you need is a 1M piping tip (I got one online for about a Euro and it’s my favorite piping tip now. I’ve used it for my funfetti cupcakes too). If you want, just watch this short video to get a better idea on how to make one.

2014-11-26 10.49.15.

IMG_9283. IMG_9282. 2014-11-29 08.49.00.2014-11-29 08.50.21. 2014-11-29 08.51.08. 2014-11-29 08.51.57. 2014-11-29 08.53.14. 2014-11-29 08.47.00. 2014-11-29 08.46.52.2014-11-29 08.43.06.  2014-11-26 10.48.37. 2014-11-26 10.49.10.  2014-11-29 08.41.59. 2014-11-29 08.42.11. 2014-11-27 15.12.32.

2014-11-29 08.39.48.

Red Velvet Rose Cake with Cream Cheese Frosting

Makes a 2-layer 8-inch cake

Ingredients

Cake:

  • 1 cup unsalted butter, softened
  • 2 cups granulated sugar
  • 2 tbsp cocoa powder
  • 1 tbsp red food coloring
  • 2 1/2 cups cake flour (or all-purpose)
  • 1 tsp baking soda
  • 1 tsp baking powder
  • 1 tsp salt
  • 1 tsp vanilla extract
  • 1 tsp white vinegar
  • 1/4 cup oil
  • 3 eggs
  • 1 1/4 cup buttermilk

Frosting:

  • 16oz cream cheese
  • 1/2 cup butter, softened
  • 2 tsp vanilla extract
  • 2 cups icing sugar, sifted (if you want a sweeter frosting, you may use up to 4 cups powdered sugar)
  • Little silver candy beads (optional)

Method:

  1. Preheat your oven to 180 degrees Celsius, or 375 degrees Fahrenheit
  2. For the cake, using a stand mixer or an electric hand mixer, cream the butter and sugar until light and fluffy (approx. 5 min)
  3. Mix in the cocoa powder, food coloring, flour, baking soda, baking powder ,salt, vanilla, vinegar, and oil until just combined. Do not over-mix
  4. Beat in the eggs one at a time
  5. Mix in the buttermilk
  6. Transfer the mixture into two greased 8 (or 9) inch cake pans
  7. Bake in oven for 35-40 minutes, until a toothpick inserted into the center comes out clean
  8. Allow the cake to cool in the pans for 10 minutes, before cooling completely on a wire rack
  9. For the frosting, using a stand mixer or an electric hand mixer, beat the cream cheese until light and fluffy
  10. Beat in the butter and vanilla extract until light and fluffy
  11. Gradually beat in the icing sugar until smooth. At this point, you could add a little bit of milk (1 tsp at a time) or a little more powdered sugar (1 tbsp at a time) until you reach a desired consistency
  12. To assemble the cake, make sure that the cakes are completely cooled before frosting. I wrapped each cake in 3 layers of plastic wrap and froze them prior to trimming/frosting. If your cakes have domed, then trim the top of the cake off so that the tops are flat
  13. Spread about 1/4-1/2 cup of frosting onto one of the layers, and place the second layer on top. Spread about 1/2 cup frosting to create a thin layer over the layered cake (this is called crumb coating. If you’re in a hurry, you could skip this step, but it’s recommended, as it will ensure that no crumbs are visible after frosting)
  14. Freeze the crumb-coated cake for at least an hour (optional, but recommended). Place a 1M piping tip into a piping bag and fill with cream cheese frosting. Pipe roses around the side of the crumb-coated cake, and then pipe roses on the top of the cake. Add swirls or kisses of frosting in the places that aren’t covered by the roses. Place a little silver candy bead in the middle of each rose if you want. Enjoy x

Pink Beetroot Crepes (Clean)

So Mother’s Day is this Sunday. Make these for her, and she’ll probably forgive you for every phone (or, in my case, every watch) you’ve ever lost.

DSC_0129.

These crepes look fancy and all, but trust me, you have no idea how incredibly easy they are to make. The batter is just 4 main ingredients, and you cook them just like you cook regular crepes. If you haven’t cooked crepes before, don’t worry, it’s not as hard as it looks.

DSC_0107.

If you want non-pink crepes, I do have a recipe for regular, healthy buckwheat crepes, just so you know.

DSC_0111.

In terms of decoration, feel free to just throw any fruits and sprinkles of sorts that you want onto it. It’s actually so much fun to make and incredibly easy. I’d recommend always having banana, unless you (or your mom) don’t like banana. You can come up with your own creations (recommended), or just try to imitate some of the designs that I did:

DSC_0158.DSC_0135.DSC_0146.DSC_0123.

By the way, did I mention how pretty the edges were? You know how crepes get that pretty, crispy, wavy, almost-lacy kind of edge? Check this out:

DSC_0145.

#legitcrepes

DSC_0119.

Anyways, don’t forget to tell your mom how beautiful she is and how much you love her this Sunday, and wake up just a little earlier to make her these crepes and show her how much you care about her. In case anyone was wondering what I’m doing for my mommy this Mother’s Day, I’m making her these pink, beetroot crepes for breakfast, baking her favorite cheesecake, taking her out for lunch, and giving her a watercolor painting of a botanical wreath with the hand-scripted gold quote, “Mothers hold their children’s hands for a short while, but their hearts forever”

DSC_0137.DSC_0128.DSC_0147.DSC_0156.DSC_0131.DSC_0118.DSC_0150.DSC_0159.

Notes: To make the beetroot purée, just stick the beetroots (unpeeled) in a big pot of boiling water until they’re soft, peel them, and purée them in a food processor. It may seem like a lot of work, but you can use it to make all your food pretty and pink, or use it to make beetroot nut butter chocolate cups or beetroot vanilla rice pudding with dark chocolate.

Pink Beetroot Crepes

Ingredients

  • 3/4 cup buckwheat flour
  • 3 eggs
  • 1 cup milk of choice
  • 4 tbsp (50g) grated/pureed beetroot (preferably cooked)
  • Pinch of salt
  • Toppings (e.g.):
    • Banana, raspberries, cherries, blueberries, mandarins, kiwi, flaked almond, cacao nibs, melted chocolate, shredded coconut, bee pollen, etc.

Method

  1. Mix all the ingredients into a bowl
  2. Place a pan over medium heat and spray the pan with cooking oil (or brush on a little coconut oil or butter)
  3. Turn the heat down to medium low and spoon 1/3-ish cup of the batter into the center of the pan
  4. Lift the pan up using the handle and turn the pan so that the batter spreads evenly into a thin layer
    • Note: If the batter doesn’t spread evenly, or cooks before you can spread it out, turn the heat down a little, or add a little bit of your milk of choice into the batter
  5. When the crepe looks dry, flip it over with a spatula and cook briefly on the other side
  6. Slide it out onto a plate to cool
  7. Repeat with the rest of the batter
  8. Serve!